How It Was Made: D&S – Fallin‘ (Magnetic Magazine Records)
Chicago-based duo D&S return to Magnetic Magazine Recordings with Fallin’, a follow-up to their 2024 release Time & Space. Where the earlier single marked their arrival, this one shows a duo finding confidence in their sound. Stripped back yet detailed, Fallin’ leans on tight percussion, evolving layers, and short vocal chops treated as rhythmic hooks rather than full toplines.
The approach makes for a track that feels precise and intentional while still moving with the energy of a club record.
The track’s balance comes through in its production choices. A rounded, sidechained bassline locks in with the kick, automation keeps the percussion shifting, and subtle pads fill space without overcrowding the mix. It’s a sign of how quickly D&S have refined their workflow, drawing on the same technical discipline that has always been part of their identity. With Fallin’, they move beyond habits and experiments into a sound that feels cohesive, direct, and ready for the floor.
In this feature, D&S break down the plugins and techniques that powered Fallin’. From shaping basslines and leads with Serum to carving space with Wavesfactory Trackspacer, smoothing highs with Soothe2, and adding motion with Soundtoys Tremolator, their process reflects a detail-driven approach that favors clarity and movement over excess. It’s a close look at how they translated methodical studio habits into a track that feels sharp, efficient, and playable.
Xfer Serum
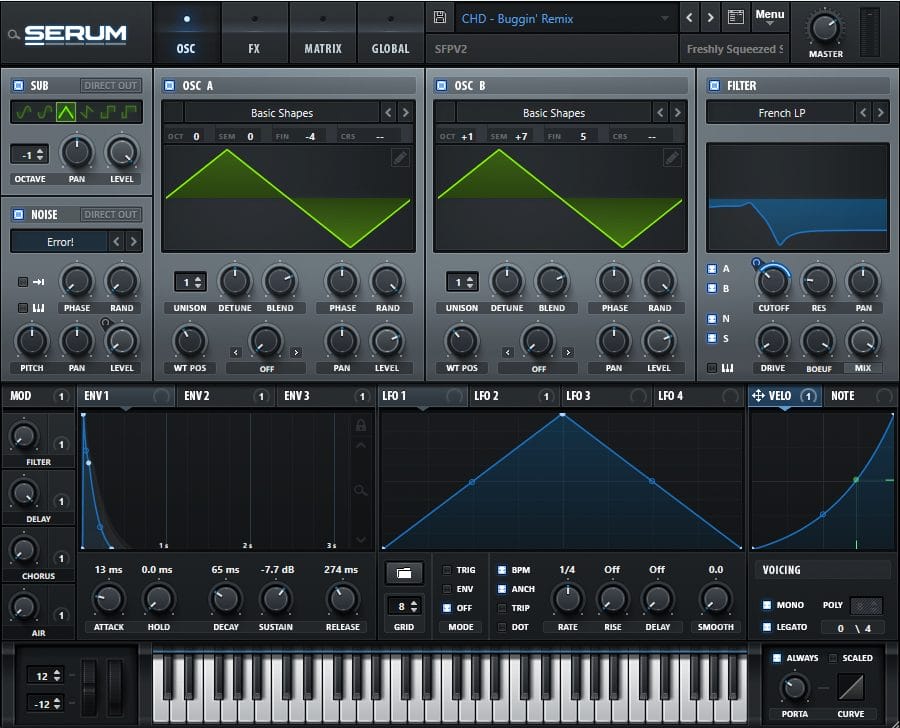
Serum is a wavetable synthesizer where you can morph and manipulate waveforms in real-time for some really expressive sounds. The interface is super visual, so you can see exactly how your sound is being shaped, which is great when you’re still learning the deeper sound design stuff. It’s powerful but never intimidating once you spend a little time with it and play around with some presets.
Serum was used for our basslines, lead synths/arps, and a couple of atmospheric pads. We started with a bass preset we liked, then tweaked the wavetable position and added some subtle unison for width. We also automated the filter cutoff throughout the track to give it more movement and adjusted the envelope to have a shorter sustain and decay for punchier notes. On the lead synths, we automated the distortion effect to about 50% to give it some unique texture during the breakdown.
If you’re making melodic house or techno, we’d say don’t be afraid to start with presets but always make them your own. A little modulation on parameters like filter cutoff or wavetable position can make a sound completely different to make it your own. Also, experiment with stacking subtle layers while keeping them cohesive. One trick we’ve learned is to use distortion effect very minimally to add a bit of grit and realism, especially if the sound feels too “digital.”
Wavesfactory Trackspacer
Trackspacer is like sidechain compression, but instead of just ducking the whole signal when another track plays, it carves out the exact frequencies the other sound needs in real-time. So different elements in your mix can sit well together without frequencies clashing. It’s one of those tools that is simple but very effective for clarity in the mix.
For Fallin’, we used Trackspacer mainly to make room for the lead vocals when they played over the melodic synth elements. We had Trackspacer subtly dip just the midrange frequencies in the pads and arps where the lead vocal was most present. We put the ratio around 15% so the vocals cut through, but the listener can still hear the melodic synths in the background. We also used it on the bass to carve space for the kick, focusing the reductions around 50-80Hz so the low end stayed punchy without losing weight.
Trackspacer is amazing for getting that polished, uncluttered mix without overdoing EQ cuts. Our advice is to not overengineer it by carving out too much, or the sounds will duck too far while the main layers are playing. It really helps melodic elements that share similar frequency ranges, like leads and pads, or kick and bass. Also, automate the amount if you want a more dynamic feel. It can help the track breathe during breakdowns versus drops.
Oeksound Soothe2
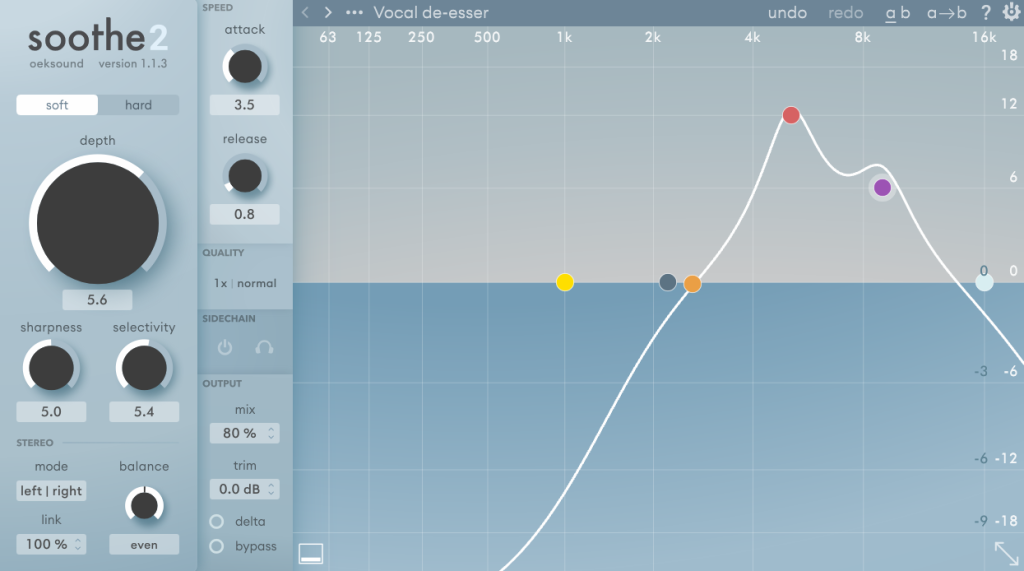
Soothe2 listens to your audio in real time and smooths out any harsh or muddy spots as they pop up. Unlike a regular EQ, it only works when those problem frequencies happen, so everything still sounds natural. We love using it on vocals, synths, drums, and basically any harsh sounds. It’s one of those plugins where once you try it, you wonder how you ever mixed without it.
We used Soothe2 on the lead vocal to smooth out the highs, using the vocal de-esser preset as a starting point. We set it to soft mode, focused on the 4–10kHz range, dialed in just enough depth, and lowered the “mix” to 80% so the harshness eased off without dulling the brightness. We also used it very subtly on the drum bus (just a 10% wet signal) to catch any stray resonances across the mix. This removed the unnecessary frequencies in the percussion elements without losing energy.
For melodic music, soothe2 is a lifesaver when you’re stacking layers or working with bright synths. Our tip is to resist the urge to overdo it though. It’s easy to go too far and make things sound lifeless. Use the “dry/wet” or “mix” feature to fine-tune the amount of depth for resonance reduction.
Soundtoys Tremolator
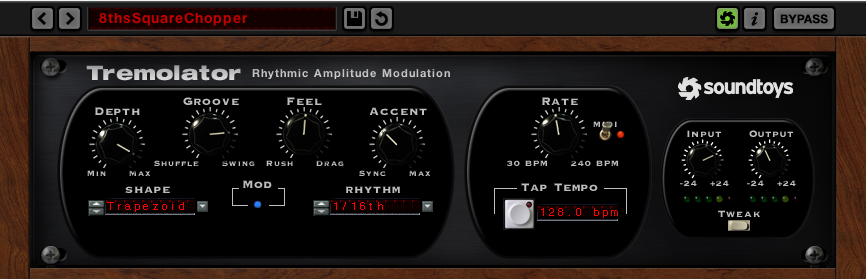
Tremolator is a creative tremolo or stutter effect we use on most of our tracks. You can shape the rhythm with different grooves and even mess with swing to get more of a natural feel. It’s one of those plugins that can be subtle or totally transform a sound depending on how far you push it.
We used Tremolator on a horn-like synth pad after the main drops to add a pulsing, rhythmic movement that matched the groove of the track. We chose a premier shape synced to 1/16 notes and added a bit of swing to make it feel less robotic. We also automated the depth from 80% up to around 100% when the sound played a 2nd time, which acted like a call and response. To make it blend, we added a 1/4 note delay after Tremolator so the synth felt like it was floating in the mix.
If you’re making melodic house, deep house, or anything with atmospheric elements, Tremolator can be a great way to add motion without overcomplicating the arrangement. Try it on pads, arps, or even vocal atmospheric elements for interesting textures. One trick we love is automating the speed or waveform shape so the movement changes subtly over time. It keeps the listener engaged without needing to add new elements.
Quick Fire Tips For Making Melodic Tech House
Tip #1: Use call-and-response techniques with each layer of your track to keep the listener interested. It’s a subtle way to add storytelling without words.
Tip #2: Incorporate vocal chops and loops as atmospheric layers. They add emotion and groove, especially when paired with reverb and delay for depth. It’s a great way to bring a human element into the mix without needing a full vocal performance.
Tip #3: A full-bodied track often comes down to clever layering. Adding subtle pads or noise textures under a bassline can make it sound fuller. These layers might not be obvious, but they’re the glue that holds the mix together and makes it feel complete.
Tip #4: Stretch and manipulate vocals when working with minimal vocal material. Pitch-shifting, chopping, and time-stretching can turn a simple line into something unique.
Tip #5: Build Tension with Automation. Automation is everything when it comes to keeping a track alive. Whether it’s subtly tweaking reverb sends or sweeping EQ filters on a buildup, those small shifts create big moments. It’s the detail that makes the drop hit harder.